Just like for customers and vendors, setting up
classes for inventory items will save you a great deal of effort when
importing new items. With all the options filled out for an item class,
importing inventory items can be fairly easy. The following example will
use two source files: Items and Prices.
The following is a typical listing of fields for the Items source file. This file will have one line per inventory item:
|
Field
|
Max. Length
|
Notes
|
|---|
|
Item Number
|
30
|
This is required and must be unique. Item Numbers should be all in caps and it is recommended not to use special characters.
|
|
Description
|
100
|
Required field.
|
|
Short Description
|
15
|
This field is optional, but recommended as it is used for lookups in
Dynamics GP. Unlike Short Names for customers and vendors, this will not
automatically default from the Description and will be blank if not
specified.
|
|
Class ID
|
10
|
Optional, but recommended. This should be a Class ID that is already created in Dynamics GP.
|
|
Standard Cost
| |
Costs are optional, however you may want to import them if you are
basing pricing on cost or need this for reporting purposes. Be sure not
to use more decimal places than the item is set up for.
|
|
Current Cost
| |
|
List Price
| |
If you are bringing in a list price in one currency only, this can be
done in one source file, otherwise, you will need multiple source files
with a listing of each Currency ID and List Price. The decimal places
should be the same as the number of currency decimals set up for each
item and currency combination.
|
|
List Price Currency ID
|
15
|
|
Default Selling
U of M
|
8
|
This should be a unit of measure that is already set up in Dynamics GP
for the U of M schedule that will be assigned to this item.
|
If you want to bring in the
main vendor for each item as part of this import, you can add the
following five fields. If you will be setting up multiple vendors for
each item, you will need to create a separate source file with the
vendor details.
|
Field
|
Max. Length
|
Notes
|
|---|
|
Vendor ID
|
15
|
This must be a Vendor ID that already exists in Dynamics GP.
|
|
Vendor Item Number
|
30
|
Both the Vendor Item Number and Vendor Description are optional. If they
are not specified, they will default to the Item Number and Description
from the item.
|
|
Vendor Description
|
100
|
|
Purchasing U of M Type
| |
This corresponds to the Default Purchasing U of M Type and can have values of From Item From Item Vendor.
or |
|
Purchasing U of M
|
8
|
If From Item Vendor
is used for the Default Purchasing U of M Type (above), then this
Default Purchasing U of M must be imported, otherwise it is not needed.
The U of M selected here must already exist in Dynamics GP.
|
The following is a listing of fields for the Prices source file. This file will have one line for each item/price combination:
|
Field
|
Max. Length
|
Notes
|
|---|
|
Item Number
|
30
|
This field must correspond to the list of Item Numbers in the Items source file and will be used to link the two source files.
|
|
Price Level
|
10
|
This should be a price level that already exists in Dynamics GP.
|
|
U of M
|
8
|
This is a unit of measure that is already set up in Dynamics GP for the U of M schedule that is being assigned to this item.
|
|
Percent
| |
Either one or the other of these should be used, but not both. If Price
is used, it should have the same number of decimal places as are set up
for the item and currency combination. Percentages can have up to two
decimal places.
|
|
Price
| |
|
Currency ID
|
15
|
This should be an existing Currency ID.
|
Once you have created your source files and set up the Items and Prices sources in Integration Manager, follow these steps to import your items:
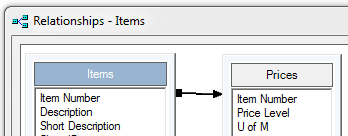
1. Create a relationship between your two source files by clicking Relationships on the top menu and dragging your mouse between the Item Number fields:
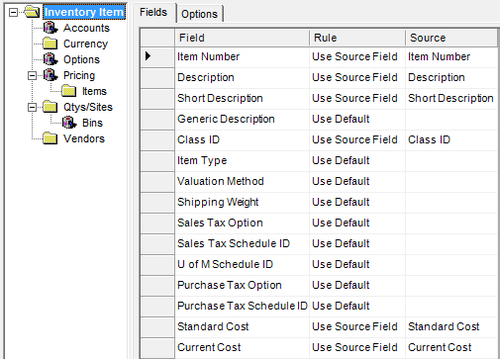
2. Under Destination Mapping select Inventory Item on the left and fill out all the fields you have included in your source file, for example:
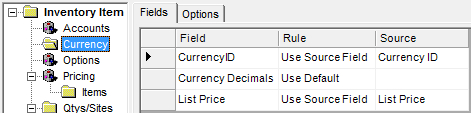
3. If you are using Multicurrency and are importing a list price, select Currency on the left and map the Currency ID and List Price:
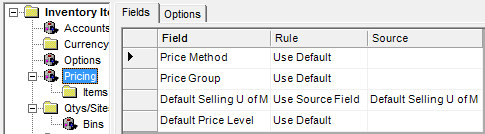
4. Select Pricing on the left and map the Default Selling U of M:
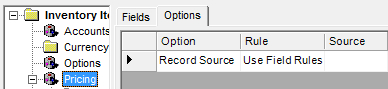
5. While in the Pricing section, switch to the Options tab and make sure the Rule for Record Source is Use Field Rules:
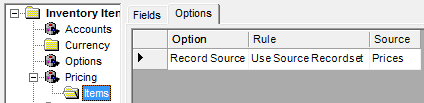
6. Select Items (under Pricing) on the left, switch to the Options tab, change the Record Source Rule to Use Source Recordset, and select Prices (or the name of your file with the prices) as the Source:
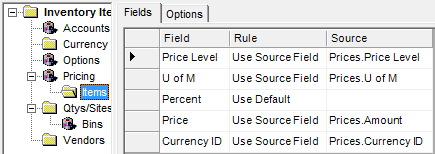
7. While still on the Items selection on the left, switch to the Fields tab and map the price detail fields. The following example shows importing amounts. If percentages are being used, then the Price Field should have a Rule of Use Default. If both are selected most often you will not receive an error but the prices will not be imported.
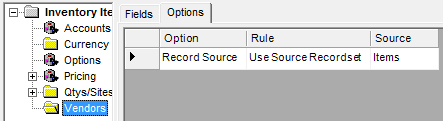
8. If you are importing vendor information for your items, select Vendors on the left. Switch to the Options tab, change the Record Source Rule to Use Source Recordset, and select Items (or the name of your file with the items) as the Source:
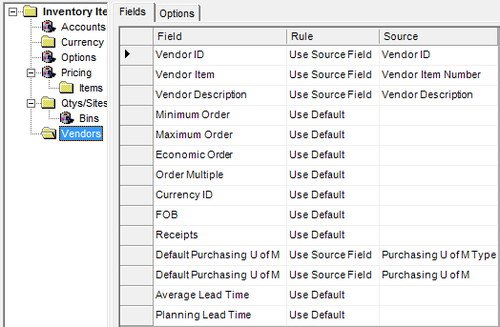
9. While still in the Vendors selection, switch to the Fields tab and map the fields you are importing for the vendors:
Two additional notes about the preceding import example:
This does not assign
the imported items to any sites.
There
is no ability to bring in different pricing depending on quantities for
the same price level using Integration Manager. Only one price per
price level is possible.
Once imported, there are two inventory SmartLists you can check to see your data: Items will have the main information and Vendor Items
will show the vendor details. There is no SmartList to show price
levels, however you can create a view to see them using the code from
this blog post: http://victoriayudin.com/2010/08/09/sql-view-for-inventory-price-levels-in-dynamics-gp/.